GitHub Setup Guide for Beginners
Complete step-by-step guide to install Git, GitHub CLI, and learn basic commands
Welcome to GitHub!
This guide will help you set up Git and GitHub from scratch, even if you've never used them before. By the end, you'll be able to clone projects, make changes, and push your code to GitHub.
What is Git and GitHub?
Git is a tool that helps you track changes in your code. Think of it like a "save game" feature for your projects.
GitHub is a website where you can store your Git projects online and share them with others.
GitHub CLI is a command-line tool that makes it super easy to work with GitHub directly from your terminal.
Step 1: Create a GitHub Account
If you don't have a GitHub account yet:
- Go to github.com
- Click Sign up
- Choose to sign up with an OAuth provider for ease, or fill in your email, password, username, and country
- Verify your email address
- Complete the setup

Done! You now have a GitHub account.
Step 2: Install Git on Your Computer
For Windows Users
-
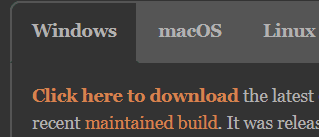
Download Git
- Go to git-scm.com/download/win
- Click the link shown in the above image
-
Install Git
- Run the downloaded
.exefile and follow the installation wizard - You can keep all default settings (recommended for beginners)
- Run the downloaded
-
Verify Installation
- Open Command Prompt or PowerShell
- Type this command and press Enter:
1 - You should see something like:
git version 2.43.0 - If you see this, Git is installed successfully! ✅
For Mac Users
-
Open Terminal
- Press
Cmd + Spaceand type "Terminal" - Press Enter
- Press
-
Install Git using Homebrew (recommended)
First, install Homebrew if you don't have it:
1 Then install Git:
1 -
Alternative: Install Xcode Command Line Tools
1 -
Verify Installation
1 - You should see something like:
git version 2.43.0
- You should see something like:
For Linux Users (Ubuntu/Debian)
-
Open Terminal
-
Update package list
1 -
Install Git
1 -
Verify Installation
1
Step 3: Install GitHub CLI
GitHub CLI (gh) makes working with GitHub much easier! It handles authentication automatically and simplifies many tasks.
For Windows Users
Using winget (Windows 11 or Windows 10 with App Installer):
| 1 | |
Manual Installation:
- Go to cli.github.com
- Download the Windows installer
- Run the
.msifile and follow the installation wizard
For Mac Users
Using Homebrew (recommended):
| 1 | |
For Linux Users (Ubuntu/Debian)
| 1 | |
For other Linux distributions, check the official installation guide.
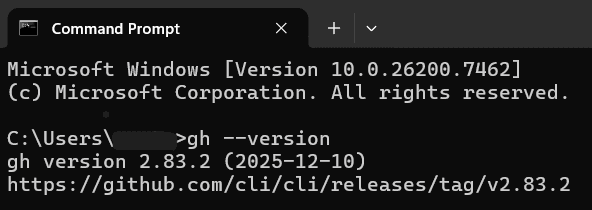
Verify GitHub CLI Installation
Open your terminal and run:
| 1 | |
You should see something like: gh version 2.40.0
Step 4: Configure Git with Your Information
Now that Git is installed, you need to tell it who you are. This information will be attached to your commits.
-
Open your terminal (Command Prompt, PowerShell, or Terminal)
-
Set your name (replace with your actual name):
1 Example:
1 -
Set your email (use the same email as your GitHub account):
1 Example:
1 -
Verify your configuration:
1 You should see your name and email in the output.
Step 5: Authenticate with GitHub using GitHub CLI
This is the easiest way to connect to GitHub! GitHub CLI will handle all the authentication for you.
Login to GitHub
-
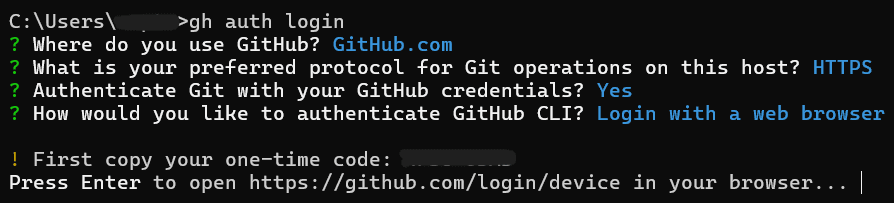
Run the authentication command:
1 -
Follow the interactive prompts:
-
What account do you want to log into?
- Select
GitHub.com(use arrow keys and press Enter)
- Select
-
What is your preferred protocol for Git operations?
- Select
HTTPS(recommended for beginners)
- Select
-
Authenticate Git with your GitHub credentials?
- Select
Yes
- Select
-
How would you like to authenticate GitHub CLI?
- Select
Login with a web browser(easiest option)
- Select
-
-
Complete the browser authentication:
- A code will appear in your terminal (e.g.,
ABCD-1234) - Press Enter to open your browser
- If it doesn't open automatically, go to github.com/login/device
- Enter the code shown in your terminal
- Click Authorize GitHub CLI
- You'll see a success message!
- A code will appear in your terminal (e.g.,
-
Verify you're logged in:
1 
You should see:
✓ Logged in as your-username
That's it! You're now authenticated and ready to use Git and GitHub. No need to remember passwords or create tokens!
Step 6: Basic Git Commands
Now you're ready to use Git! Here are the essential commands you'll use every day.
Clone a Repository (Download a Project)
Cloning means downloading a project from GitHub to your computer.
Using GitHub CLI (Easiest!)
| 1 | |
Example:
| 1 | |
Using Git (Traditional Method)
-
Find the repository on GitHub
-
Click the green "Code" button
-
Copy the HTTPS URL
-
In your terminal, navigate to where you want the project:
1 -
Clone the repository:
1 Example:
1 -
Navigate into the project:
1 Example:
1
Check Status (See What Changed)
See which files you've modified:
| 1 | |
This shows:
- Files that are ready to commit (green)
- Files that are modified but not staged (red)
- New files that aren't tracked yet
Add Files (Stage Changes)
Before you can save (commit) your changes, you need to stage them.
Add a specific file:
| 1 | |
Add all changed files:
| 1 | |
Example:
| 1 | |
Or add everything:
| 1 | |
Commit Changes (Save Your Work)
A commit is like saving a checkpoint in your project.
| 1 | |
Example:
| 1 | |
Tips for good commit messages:
- Be clear and specific
- Use present tense ("Add feature" not "Added feature")
- Keep it short (under 50 characters if possible)
Push Changes (Upload to GitHub)
Pushing sends your commits from your computer to GitHub.
| 1 | |
Or if it's your first push on a new branch:
| 1 | |
Note: The default branch might be called main or master depending on the repository.
Pull Changes (Download Updates)
If someone else made changes to the project on GitHub, you can download them:
| 1 | |
This updates your local copy with the latest changes from GitHub.
Step 7: Complete Workflow Example
Here's a typical workflow when working on a project:
Starting a New Project
-
Clone the repository:
1 -
Make your changes (edit files, add new files, etc.)
-
Check what changed:
1 -
Stage your changes:
1 -
Commit your changes:
1 -
Push to GitHub:
1
Daily Workflow
| 1 | |
Bonus: Useful GitHub CLI Commands
GitHub CLI makes many tasks easier! Here are some helpful commands:
View Repository Information
| 1 | |
Create a New Repository (interactive mode)
| 1 | |
Common Scenarios
Scenario 1: Starting Fresh with a New Repository
Create a new repository using GitHub CLI:
| 1 | |
Scenario 2: You Made a Mistake in Your Commit Message
If you just committed and want to change the message:
| 1 | |
Scenario 3: You Want to Undo Changes
Undo changes to a file (before staging):
| 1 | |
Unstage a file (after git add):
| 1 | |
Undo the last commit (keep changes):
| 1 | |
Troubleshooting
Problem: "gh: command not found"
Solution: GitHub CLI isn't installed or not in your PATH.
- Reinstall GitHub CLI following Step 3
- Close and reopen your terminal
- On Windows, restart your computer if needed
Problem: "Authentication failed"
Solution: You need to login again.
| 1 | |
Problem: "fatal: not a git repository"
Solution: You're not in a Git project folder.
- Make sure you're in the correct directory
- Or initialize Git with:
git init
Problem: "Your branch is behind 'origin/main'"
Solution: Someone else pushed changes. Pull them first:
| 1 | |
Problem: Merge Conflicts
Solution: When two people edit the same file:
- Git will mark the conflicts in your files
- Open the file and look for
<<<<<<<,=======,>>>>>>> - Edit the file to keep what you want
- Remove the conflict markers
- Stage and commit:
1
Quick Reference Cheat Sheet
Essential Git Commands
| Command | What it does |
|---|---|
git clone <url> | Download a repository from GitHub |
git status | See what files have changed |
git add . | Stage all changes |
git add <file> | Stage a specific file |
git commit -m "message" | Save your changes with a message |
git push | Upload commits to GitHub |
git pull | Download updates from GitHub |
git log | See commit history |
Essential GitHub CLI Commands
| Command | What it does |
|---|---|
gh auth login | Login to GitHub |
gh auth status | Check login status |
gh repo clone <repo> | Clone a repository |
gh repo create <name> | Create a new repository |
gh repo view | View repository info |
gh pr create | Create a pull request |
gh pr list | List pull requests |
gh issue list | List issues |
Configuration Commands
| Command | What it does |
|---|---|
git config --global user.name "Name" | Set your name |
git config --global user.email "email" | Set your email |
git config --list | View all settings |
Why GitHub CLI is Better for Beginners
No complex authentication setup - Just gh auth login and you're done!
Fewer commands to remember - gh repo clone instead of copying URLs
Built-in help - Type gh to see all available commands
Works seamlessly with Git - Automatically configures everything
Interactive prompts - Guides you through each step
No need for Personal Access Tokens - Authentication is handled for you
Next Steps
Now that you have Git and GitHub CLI set up, you can:
- Clone the Ideathon starter repository
- Make changes to your project
- Commit and push your work
- Collaborate with your team
Ready to start building? Head over to the Getting Started Guide to begin your Ideathon project!
Additional Resources
- GitHub CLI Documentation: cli.github.com/manual
- Official Git Documentation: git-scm.com/doc
- GitHub Guides: guides.github.com
- Interactive Git Tutorial: learngitbranching.js.org
Need Help?
- Discord - Ask in the GDG Discord server
- Mentors - Talk to your assigned mentors
- Email - Contact the organizing team
Happy coding!